小技巧专栏
自定义KeepAliveWrapper 缓存页面
AutomaticKeepAliveClientMixin 可以快速的实现页面缓存功能,但是通过混入的方式实现不是很优雅, 所以我们有必要对 AutomaticKeepAliveClientMixin 混入进行封装。
import 'package:flutter/material.dart';

class KeepAliveWrapper extends StatefulWidget {
    const KeepAliveWrapper({Key? key, @required this.child, this.keepAlive = true})
    : super(key: key);

    final Widget? child;
    final bool keepAlive;

    @override
    State<KeepAliveWrapper> createState() => _KeepAliveWrapperState();
}

class _KeepAliveWrapperState extends State<KeepAliveWrapper> with AutomaticKeepAliveClientMixin {
    @override
    Widget build(BuildContext context) {
        return widget.child!;
    }

    @override
    bool get wantKeepAlive => widget.keepAlive;

    @override
    void didUpdateWidget(covariant KeepAliveWrapper oldWidget) {
        if (oldWidget.keepAlive != widget.keepAlive) {
            // keepAlive 状态需要更新,实现在 AutomaticKeepAliveClientMixin 中
            updateKeepAlive();
        }
        super.didUpdateWidget(oldWidget);
    }
}
这里使用 covariant 协变关键字,感兴趣可以研究一下 dart covariant
监听 TabController 改变事件
void initState() {
    super.initState();
    _tabController = TabController(length: 8, vsync: this);
    //监听_tabController的改变事件
    _tabController.addListener(() {
        if (_tabController.animation!.value ==_tabController.index) {
            print(_tabController.index); //获取点击或滑动页面的索引值
        }
    });
}
MaterialApp 去掉 debug 图标
return MaterialApp(
    debugShowCheckedModeBanner:false , //去掉debug图标
    home:Tabs(),
    ...
);
自定义 Dialog 、Material组件、InkWell组件
自定义 Dialog 对象,需要继承 Dialog 类,尽管 Dialog 提供了 child 参数可以用来写视图界面,但是往往会达不到我们想要的效果,因为默认的 Dialog 背景框是满屏的。如果我们想完全定义界面,就需要重写 build 函数。下面我们通过两个案例给大家演示一下 Dialog 的使用。
自定义一个提示的 Dialog
- 新建myDialog.dart
import 'dart:async';
import 'package:flutter/material.dart';

// ignore: must_be_immutable
class MyDialog extends Dialog {
    String title;
    String content;
    Function()? onClosed;
    MyDialog({Key? key, required this.title, required this.onClosed, this.content=""}) : super(key: key);

    @override
    Widget build(BuildContext context) {
        return Material(
            type: MaterialType.transparency,
            child: Center(
                child: Container(
                    height: 300,
                    width: 300,
                    color: Colors.white,
                    child: Column(
                        children: <Widget>[
                            Padding(
                                padding: const EdgeInsets.all(10),
                                child: Stack(
                                    children: <Widget>[
                                        Align(
                                            alignment: Alignment.center,
                                            child: Text(title),
                                        ), // Align
                                        Align(
                                            alignment: Alignment.centerRight,
                                            child: InkWell(
                                                onTap: onClosed,
                                                child: const Icon(Icons.close),
                                            ), // InkWell
                                        ) // Aligns
                                    ],
                                ), // Stack
                            ), // Padding
                            const Divider(),
                            Container(
                                padding: const EdgeInsets.all(10),
                                width: double.infinity,
                                child: Text(
                                    content,
                                    textAlign: TextAlign.left
                                ), // Text
                            ) // Container
                        ],
                    ), // Column
                ) // Container
            ), // Center
        ); // Material
    }
}
- 调用Mydialog
void _myDialog() async {
    await showDialog(
        barrierDismissible: true, //表示点击灰色背景的时候是否消失弹出框
        context: context,
        builder: (context) {
            return MyDialog(
                title: '标题',
                onClosed: () {
                    print("关闭");
                    Navigator.of(context).pop();
                },
                content: "我是一个内容"
            );
        }
    );
}
- 定时器 让 dialog 自动关闭
const timeout = Duration(seconds: 3);

var t = Timer.periodic(timeout, (timer) {
    print('afterTimer='+DateTime.now().toString());
    // 取消定时器
    // timer.cancel();
});

t.cancel(); // 取消定时器
组件销毁的时候取消定时器
void dispose() {
    super.dispose();
    t.cancel();
}
- MyDialog过几秒后关闭
import 'dart:async';
import 'package:flutter/material.dart';
// ignore: must_be_immutable
class MyDialog extends Dialog {
    String title;
    String content;
    Function()? onClosed;
    MyDialog({ Key? key, required this.title, required this.onClosed, this.content= "" }) : super(key: key);

    _showTimer(context){
        Timer.periodic(
        Duration(milliseconds: 3000), (t) {
            print('关闭');
            Navigator.of(context).pop();
            t.cancel();
        });
    }

    @override
    Widget build(BuildContext context) {
        _showTimer(context);
        return Material(
            type: MaterialType.transparency,
            child: Center(
                child: Container(
                    height: 300,
                    width: 300,
                    color: Colors.white,
                    child: Column(
                        children: <Widget>[
                            Padding(
                                padding: const EdgeInsets.all(10),
                                child: Stack(
                                    children: <Widget>[
                                        Align(
                                            alignment: Alignment.center,
                                            child: Text(title),
                                        ), // Align
                                        Align(
                                            alignment: Alignment.centerRight,
                                            child: InkWell(
                                                onTap: onClosed,
                                                child: const Icon(Icons.close),
                                            ),
                                        ) // Align
                                    ],
                                ), // Stack
                            ), // Padding
                            const Divider(),
                            Container(
                                padding: const EdgeInsets.all(10),
                                width: double.infinity,
                                child: Text(content,
                                    textAlign: TextAlign.left
                                ),
                            ) // Container
                        ],
                    ), // Column
                ) // Container
            ), // Center
        ); // Material
    }
}
PageView 上拉无限加载的实现思路
import 'package:flutter/material.dart';

class PageViewPage extends StatefulWidget {
    const PageViewPage({super.key});
    @override
    State<PageViewPage> createState() => _PageViewPageState();
}

class _PageViewPageState extends State<PageViewPage> {
    final List<Widget> _list = [];
    @override
    void initState() {
        // TODO: implement initState
        super.initState();
        for (var i = 0; i < 10; i++) {
            _list.add(MyPage(text:"$i"));
        }
    }

    @override
    Widget build(BuildContext context) {
        return Scaffold(
            appBar: AppBar(
                title: const Text("pageview演示"),
            ),
            body: PageView(
                scrollDirection: Axis.vertical, // 滑动方向为垂直方向
                onPageChanged: (index){
                    print(index);
                    print(_list.length);
                    if(index+2 == _list.length) {
                        setState(() {
                            for (var i = 0; i < 10; i++) {
                                _list.add(MyPage(text:"$i"));
                            }
                        });
                    }
                },
                children:_list,
            )
        );
    }
}

class MyPage extends StatefulWidget {
    final String text;
    const MyPage({super.key,required this.text});
    @override
    State<MyPage> createState() => _MyPageState();
}

class _MyPageState extends State<MyPage> {
    @override
    Widget build(BuildContext context) {
        return Center(
            child: Text(widget.text,style: Theme.of(context).textTheme.headline1),
        );
    }
}
PageView 实现一个无限轮播的轮播图
import 'package:flutter/material.dart';

class PageViewPage extends StatefulWidget {
    const PageViewPage({super.key});
    @override
    State<PageViewPage> createState() => _PageViewPageState();
}

class _PageViewPageState extends State<PageViewPage> {
    List<Widget> pageList = [];
    @override
    void initState() {
        List listData = [
            {
            "imageUrl": 'https://www.au-sonpo.co.jp/common/img/id0026.jpeg',
            },
            {
            "imageUrl": 'https://www.au-sonpo.co.jp/common/img/id0026.jpeg',
            },
            {
            "imageUrl": 'https://www.au-sonpo.co.jp/common/img/id0026.jpeg',
            }
        ];

        for (int i = 0; i < listData.length; ++i) {
            pageList.add(
                PicturePage(
                    url: listData[i]["imageUrl"],
                )
            );
        }
    }

    @override
    Widget build(BuildContext context) {
        return Scaffold(
            appBar: AppBar(
                title: const Text("pageview演示"),
            ), // AppBar
            body: ListView(
                children: [
                    Swiper(pageList: pageList)
                ],
            ) // ListView
        ); // Scaffold
    }
}

//Swiper组件

class Swiper extends StatefulWidget {
    final double width;
    final double height;
    final List<Widget> pageList;
    const Swiper(
        { super.key,
        this.width = double.infinity,
        this.height = 200,
        required this.pageList }
    );
    @override
    State<Swiper> createState() => _SwiperState();
}

class _SwiperState extends State<Swiper> {
    int _currentPageIndex = 0;
    @override
    void initState() {
        super.initState();
    }
    @override
    Widget build(BuildContext context) {
        return Stack(
            children: [
                SizedBox(
                    width: double.infinity,
                    height: 200,
                    child: PageView.builder(
                        onPageChanged: (int index) {
                            setState(() {
                                _currentPageIndex = index % (widget.pageList.length);
                            });
                        },
                        itemCount: 10000,
                        itemBuilder: (context, index) {
                            return widget.pageList[index % (widget.pageList.length)];
                        }
                    ),
                ), // SizedBox

                Positioned(
                    bottom: 10,
                    left: 0,
                    right: 0,
                    child: Row(
                        mainAxisAlignment: MainAxisAlignment.center,
                        children: List.generate(widget.pageList.length, (i) {
                            return Container(
                                margin: const EdgeInsets.fromLTRB(2, 0, 2, 0),
                                width: 10,
                                height: 10,
                                decoration: BoxDecoration(
                                    shape: BoxShape.circle,
                                    color: _currentPageIndex == i ? Colors.blue : Colors.grey
                                ),
                            ); // Container
                        }).toList(),
                    ), // Row
                ), // Positioned
            ],
        );
    }
}

//PicturePage 图片页面
class PicturePage extends StatefulWidget {
    final String url;
    final double width;
    final double height;
    const PicturePage(
        { super.key,
        required this.url,
        this.width = double.infinity,
        this.height = 200 }
    );
    @override
    State<PicturePage> createState() => _PicturePageState();
}

class _PicturePageState extends State<PicturePage> {
    @override
    Widget build(BuildContext context) {
        print(widget.url);
        return SizedBox(
            width: widget.width,
            height: widget.height,
            child: Image.network(widget.url, fit: BoxFit.cover),
        ); // SizedBox
    }
}
定时器
const timeout = Duration(seconds: 3);

var t = Timer.periodic(timeout, (timer) {
print('afterTimer='+DateTime.now().toString());
// timer.cancel(); // 取消定时器
});

t.cancel(); // 取消定时器
组件销毁的时候取消定时器
void dispose() {
    super.dispose();
    t.cancel();
}
PageController animateToPage 自动切换页面
import 'dart:async';
import 'package:flutter/material.dart';

class PageViewPage extends StatefulWidget {
    const PageViewPage({super.key});
    @override
    State<PageViewPage> createState() => _PageViewPageState();
}

class _PageViewPageState extends State<PageViewPage> {
    List<Widget> pageList = [];

    @override
    void initState() {
        List listData = [
            {
            "imageUrl": 'https://www.au-sonpo.co.jp/common/img/id0026.jpeg',
            },
            {
            "imageUrl": 'https://www.au-sonpo.co.jp/common/img/id0026.jpeg',
            },
            {
            "imageUrl": 'https://www.au-sonpo.co.jp/common/img/id0026.jpeg',
            }
        ];

        for (int i = 0; i < listData.length; ++i) {
            pageList.add(
                PicturePage(
                    url: listData[i]["imageUrl"],
                )
            );
        }
    }

    @override
    Widget build(BuildContext context) {
        return Scaffold(
            appBar: AppBar(
                title: const Text("pageview演示"),
            ),
            body: ListView(
                children: [Swiper(pageList: pageList)],
            )
        );
    }
}

//Swiper组件
class Swiper extends StatefulWidget {
    final double width;
    final double height;
    final List<Widget> pageList;

    const Swiper(
        {super.key,
        this.width = double.infinity,
        this.height = 200,
        required this.pageList}
    );

    @overrideState<Swiper> createState() => _SwiperState();
}

class _SwiperState extends State<Swiper> {
    late PageController _pageController;
    int _currentPageIndex = 0;
    late Timer timer;

    @override
    void initState() {
        super.initState();
        _pageController = PageController(initialPage: 0);
        const timeout = Duration(seconds: 3);
            timer=Timer.periodic(timeout, (timer) {
                //跳转
                _pageController.animateToPage(
                    (_currentPageIndex + 1) % (widget.pageList.length),
                    curve: Curves.linear,
                    duration: const Duration(milliseconds: 200)
                );
                // timer.cancel(); // 取消定时器
            });
        }
        void dispose() {
        super.dispose();
        timer.cancel();
        _pageController.dispose();
    }

    @override
    Widget build(BuildContext context) {
        return Stack(
            children: [
                SizedBox(
                    width: double.infinity,
                    height: 200,
                    child: PageView.builder(
                        controller: _pageController,
                        onPageChanged: (int index) {
                            setState(() {
                                _currentPageIndex = index % (widget.pageList.length);
                            });
                        },
                        itemCount: 10000,
                        itemBuilder: (context, index) {
                            return widget.pageList[index % (widget.pageList.length)];
                        }
                    ),
                ), // SizedBox
                Positioned(
                    bottom: 10,
                    left: 0,
                    right: 0,
                    child: Row(
                        mainAxisAlignment: MainAxisAlignment.center,
                        children: List.generate(
                            widget.pageList.length, (i) {
                            return Container(
                                margin: const EdgeInsets.fromLTRB(2, 0, 2, 0),
                                width: 10,
                                height: 10,
                                decoration: BoxDecoration(
                                    shape: BoxShape.circle,
                                    color: _currentPageIndex == i ? Colors.blue : Colors.grey
                                ),
                            );
                        }).toList(),
                    ), // Row
                ), // Positioned
            ],
        );
    }
}

//PicturePage 图片页面
class PicturePage extends StatefulWidget {
    final String url;
    final double width;
    final double height;

    const PicturePage(
        { super.key,
        required this.url,
        this.width = double.infinity,
        this.height = 200 }
    );
    @override
    State<PicturePage> createState() => _PicturePageState();
}

class _PicturePageState extends State<PicturePage> {
    @override
    Widget build(BuildContext context) {
        print(widget.url);
        return SizedBox(
            width: widget.width,
            height: widget.height,
            child: Image.network(widget.url, fit: BoxFit.cover),
        );
    }
}
AutomaticKeepAliveClientMixin 缓存 PageView 页面
通过上面的例子我们会发现 每次滑动的时候都会触发子组件中的 build 方法 print(widget.url);
可见 PageView 默认并没有缓存功能,一旦页面滑出屏幕它就会被销毁 ,实际项目开发中对页面进行缓
存是很常见的一个需求,下面我们就看看如何使用 AutomaticKeepAliveClientMixin 缓存页面。
使用时一定要注意是否必要,因为对所有列表项都缓存的会导致更多的内存消耗。
import 'package:flutter/material.dart';
import '../res/listData.dart';

class PageViewPage extends StatefulWidget {
    const PageViewPage({super.key});

    @override
    State<PageViewPage> createState() => _PageViewPageState();
}

class _PageViewPageState extends State<PageViewPage> {
    List<Widget> children = <Widget>[];
    @override
    void initState() {
        super.initState();
        for (int i = 0; i < listData.length; ++i) {
            children.add(
                PicturePage(
                    url: listData[i]["imageUrl"],
                )
            );
        }
    }
    @override
    Widget build(BuildContext context) {
        print("build ");
        return Scaffold(
            appBar: AppBar(
                title: const Text("pageview演示"),
            ),
            body: ListView(
                children: [
                    AspectRatio(
                        aspectRatio: 16 / 9,
                        child: PageView(
                        // scrollDirection: Axis.vertical, // 滑动方向为垂直方向
                            children: children,
                        ),
                    ),
                    const Text("text组件")
                ],
            )
        );
    }
}

//PicturePage子页面
class PicturePage extends StatefulWidget {
    final String url;
    const PicturePage({super.key, required this.url});
    @override
    State<PicturePage> createState() => _PicturePageState();
}

class _PicturePageState extends State<PicturePage> with AutomaticKeepAliveClientMixin {
    @override
    Widget build(BuildContext context) {
        print(widget.url);
        return Center(
            child: AspectRatio(
                aspectRatio: 16 / 9,
                child: Image.network(widget.url,
                    fit: BoxFit.cover
                ),
            ),
        );
    }
    @override
    // TODO: implement wantKeepAlive
    bool get wantKeepAlive => true;
}
AnimatedList 实现动态列表
AnimatedList 实现动画
AnimatedList 和 ListView 的功能大体相似,不同的是, AnimatedList 可以在列表中插入或删除节点时执行一个动画,在需要添加或删除列表项的场景中会提高用户体验。
AnimatedList 是一个 StatefulWidget ,它对应的 State 类型为 AnimatedListState ,添加和删除元素的方法位于 AnimatedListState 中:
void insertItem(int index, { Duration duration = _kDuration });
void removeItem(int index, AnimatedListRemovedItemBuilder builder, { Duration duration = _kDuration });
AnimatedList 常见属性:
| 属性 | 类型 | 含义 |
|---|---|---|
key | globalKey final globalKey = GlobalKey(); | |
initialItemCount | 子元素数量 | |
itemBuilder | 方法 ( BuildContext context, int index, Animation animation) {} |
关于 GlobalKey : 每个 Widget 都对应一个 Element ,我们可以直接对 Widget 进行操作,但是无法直
接操作 Widget 对应的 Element 。而 GlobalKey 就是那把直接访问 Element 的钥匙。通过 GlobalKey
可以获取到 Widget 对应的 Element 。
AnimatedList 增加列表 FadeTransition、ScaleTransition
import 'package:flutter/material.dart';

class AnimatedListPage extends StatefulWidget {
    const AnimatedListPage({super.key});
    @override
    State<AnimatedListPage> createState() => _AnimatedListPageState();
}

class _AnimatedListPageState extends State<AnimatedListPage> {
    final globalKey = GlobalKey<AnimatedListState>();
    List<String> list = ["第一条数据","第二条数据"];

    @override
    void initState() {
    // TODO: implement initState
    super.initState();
    }

    @override
    Widget build(BuildContext context) {
        return Scaffold(
            floatingActionButton: FloatingActionButton(
                onPressed: (){
                    list.add("这是一个数据");
                    globalKey.currentState!.insertItem(list.length - 1);
                },
                child: const Icon(Icons.add),
            ), // floatingActionButton
            appBar: AppBar(
                title: const Text("AppBar组件"),
            ), // AppBar
            body: AnimatedList(
                key: globalKey,
                initialItemCount: list.length,
                itemBuilder: (context, index, animation) {
                    return FadeTransition(
                        opacity: animation,
                        child: ListTile(
                            title: Text(list[index]),
                            trailing: Icon(Icons.delete)
                        ), // ListTile
                    ); // FadeTransition
                }
            ), // AnimatedList
        ); // Scaffold
    }
}
import 'package:flutter/material.dart';

class AnimatedListPage extends StatefulWidget {
    const AnimatedListPage({super.key});@override
    State<AnimatedListPage> createState() => _AnimatedListPageState();
}

class _AnimatedListPageState extends State<AnimatedListPage> {
    final globalKey = GlobalKey<AnimatedListState>();
    List<String> list = ["第一条数据","第二条数据"];

    @override
    void initState() {
        // TODO: implement initState
        super.initState();
    }

    @override
    Widget build(BuildContext context) {
        return Scaffold(
            floatingActionButton: FloatingActionButton(
                onPressed: (){
                    list.add("这是一个数据");
                    globalKey.currentState!.insertItem(list.length - 1);
                },
                child: const Icon(Icons.add),
            ), // Scaffold
            appBar: AppBar(
                title: const Text("AppBar组件"),
            ), // AppBar
            body: AnimatedList(
                key: globalKey,
                initialItemCount: list.length,
                itemBuilder: (context, index, animation) {
                    print(animation);
                    return ScaleTransition(
                        scale: animation,
                        child: ListTile(
                            title: Text(list[index]),
                            trailing: Icon(Icons.delete)
                        ), // ListTile
                    ); // ScaleTransition
                }
            ), // AnimatedList
        );
    }
}
import 'dart:async';
import 'package:flutter/material.dart';

class AnimatedListPage extends StatefulWidget {
    const AnimatedListPage({super.key});
    @override
    State<AnimatedListPage> createState() => _AnimatedListPageState();
}

class _AnimatedListPageState extends State<AnimatedListPage> {
    final globalKey = GlobalKey<AnimatedListState>();
    bool flag = true;

    List<String> list = ["第一条数据", "第二条数据"];
    @override
    void initState() {
        // TODO: implement initState
        super.initState();
    }

    Widget _buildItem(context, index) {
        return ListTile(
            key: ValueKey(index),
            title: Text(list[index]),
            trailing: IconButton(
                icon: Icon(Icons.delete),
                // 点击时删除
                onPressed: () => _deleteItem(context, index),
            )
        );
    }

    _deleteItem(context, index) {
        if (flag == true) {
            flag = false;
            print(index);
            //注意:删除后需要重新setState
            setState(() {
                // 删除过程执行的是反向动画,animation.value 会从1变为0
                globalKey.currentState!.removeItem(index, (context, animation) {
                    //注意先build然后再去删除
                    var item = _buildItem(context, index);
                    list.removeAt(index);
                    return FadeTransition(
                        opacity: animation,
                        child: item,
                    );
                },
                duration: Duration(milliseconds: 500));
            });
            //解决快速删除bug 重置flag
            const timeout = Duration(milliseconds: 600);
            Timer.periodic(timeout, (timer) {
                flag=true;
                timer.cancel();
            });
        }
    }

    @override
    Widget build(BuildContext context) {
        return Scaffold(
            floatingActionButton: FloatingActionButton(
                onPressed: () {
                    // 增加 animation.value 会从0变为1
                    list.add("这是一个数据");
                    globalKey.currentState!.insertItem(list.length - 1);
                },
                child: const Icon(Icons.add),
            ), // FloatingActionButton
            appBar: AppBar(
                title: const Text("AppBar组件"),
            ), // AppBar
            body: AnimatedList(
                key: globalKey,
                initialItemCount: list.length,
                itemBuilder: (context, index, animation) {
                    return FadeTransition(
                        opacity: animation,
                        child: _buildItem(context, index),
                    ); // FadeTransition
                }
            ), // AnimatedList
        );
    }
}
Hero + photo_view 实现微信朋友圈图片预览
photo_view 插件支持预览图片,可放大、缩小、滑动图片
photo_view 官方地址:https://pub.dev/packages/photo_view
photo_view 预览单张图片
- 配置依赖
dependencies:
    photo_view: ^0.14.0
- 引入
import 'package:photo_view/photo_view.dart';
- 单张图片的预览
@override
Widget build(BuildContext context) {
    return Container(
        child: PhotoView(
            imageProvider: AssetImage("assets/large-image.jpg"),
        )
    );
}
photo_view 预览多张图片
- 配置依赖
dependencies:
    photo_view: ^0.14.0
- 引入
import 'package:photo_view/photo_view_gallery.dart';
- 多张图片的预览
PhotoViewGallery.builder(
    itemCount: 5,
    builder: ((context, index) {
        return PhotoViewGalleryPageOptions(
            imageProvider: NetworkImage(listData[index]["imageUrl"])
        );
    })
)
PhotoViewGallery.builder(
    scrollPhysics: const BouncingScrollPhysics(),
    builder: (BuildContext context, int index) {
        return PhotoViewGalleryPageOptions(
            imageProvider: NetworkImage(widget.imageItems[index]["imageUrl"]),
        );
    },
    scrollDirection: widget.direction,
    itemCount: widget.imageItems.length,
    backgroundDecoration: const BoxDecoration(color: Colors.black),
    pageController: PageController(initialPage: 1),
    onPageChanged: (index) => setState(() {
        currentIndex = index;
    })
)
PhotoViewGallery.builder属性:
| 属性 | 描述 |
|---|---|
scrollPhysics | BouncingScrollPhysics() 滑动到边界的时候有弹跳的效果 |
scrollDirection | Axis.horizontal 水平 、Axis.vertical 垂直方向 |
backgroundDecoration | 背景颜色 |
builder | builder 函数 根据配置的 itemCount 渲染函数 |
itemCount | 数量 |
pageController | PageController(initialPage: 1) |
onPageChanged | onPageChanged 触发的方法 |
实现一个简单的新闻系统
涉及的api接口
新闻列表:https://www.phonegap100.com/appapi.php?a=getPortalList&catid=20&page=1
新闻详情:https://www.phonegap100.com/appapi.php?a=getPortalArticle&aid=20
flutter_html 解析 html
flutter_html官方文档:https://pub.flutter-io.cn/packages/flutter_html
flutter_html示例demo:https://github.com/Sub6Resources/flutter_html/tree/master/example
Html(
    data: _list[0]["content"],
    style: {
        "body": Style(
            backgroundColor: Color.fromARGB(255, 250, 250, 250)
        ),
        "p": Style(
            fontSize: FontSize.medium
        ),
    },
    onLinkTap: (url, context, attributes, element) {
        print(url);
    }
)
flutter_inappwebview 插件的使用
插件地址:https://pub.dev/packages/flutter_inappwebview
Example地址:https://github.com/pichillilorenzo/flutter_inappwebview/tree/master/example/lib
InAppWebView(
    initialUrlRequest: URLRequest(
        url: Uri.parse("https://www.phonegap100.com/newscontent.php?aid=${widget.arguments['aid']}")
    ),
    onProgressChanged: (InAppWebViewController controller, int progress) {
        if (progress / 100 > 0.99) {
            setState(() {
                _showLoading = true;
            });
        }
    },
)
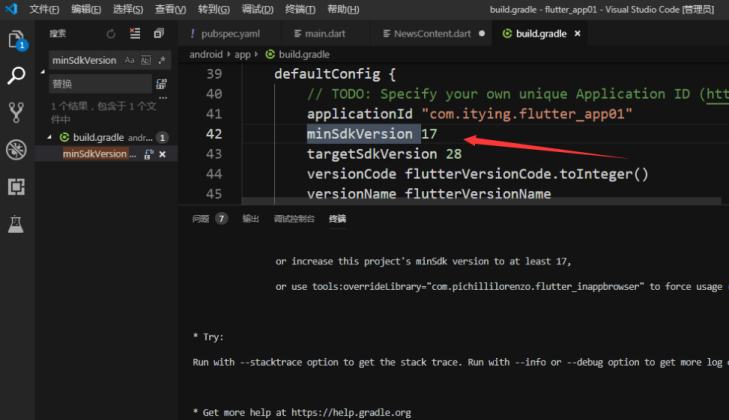
Android 中配置 flutter_inappwebview
- minSdkVersion 17
- 配置权限
android/app/src/main/AndroidManifest.xml:
<uses-permission android:name="android.permission.INTERNET"/>
使用https请求数据(注意)
Ios 中配置 flutter_inappwebview
如果打开链接的时候提示 An SSL error has occurred and a secure connection to the server cannot be made.
解决方法1(测试中可以使用):
对于
iOS9,Apple做出了一个重大决定,即iOS 9禁用了来自iOS应用程序的所有不安全HTTP流量,这是应用程序传输安全性(ATS)的一部分。要简单地禁用ATS,可以通过打开Info.plist并遵循以下步骤,并添加以下几行。<key>NSAppTransportSecurity</key>
<dict>
<key>NSAllowsArbitraryLoads</key>
<true/>
</dict>
2017 年 1 月 1 日起,所有的新提交 app 默认是不允许使用 NSAllowsArbitraryLoads 来绕过 ATS 限制的,
所以加载的 web 建议使用安全的 https 。
解决方法2-(目前可以):
2017年1月1日起苹果提出所有新提交的
App默认不允许使用NSAllowsArbitraryLoads来绕过ATS的限制。也就是说强制我们用HTTPS。那么一些第三方的SDK并没有及时支持HTTPS怎么解决呢?
解决办法:
把不支持HTTPS的第三方接口添加到NSExceptionDomains白名单中配置如下:
在Info.plist中添加NSAppTransportSecurity类型Dictionary。
在NSAppTransportSecurity中添加NSExceptionDomains类型Dictionary。
在NSExceptionDomains中添加要支持的域(也就是非HTTPS的接口地址),域作为Key,类型为Dictionary。
<key>NSAppTransportSecurity</key>
<dict>
    <key>NSExceptionDomains</key>
    <dict>
        <key>phonegap100.com</key>
        <dict>
            <key>NSIncludesSubdomains</key>
            <true/>
            <key>NSExceptionRequiresForwardSecrecy</key>
            <false/>
            <key>NSExceptionAllowsInsecureHTTPLoads</key>
            <true/>
        </dict>
    </dict>
</dict>
解决方法3(推荐):后端配置苹果支持的https证书
https://www.west.cn/faq/list.asp?unid=1314
2017 年 1 月 1 日开始,苹果要求所有
iOS应用必须使用ATS(App Transport Security),即APP内连接必须使用安全的HTTPS并且需要满足ios9中的新特性。证书颁发机构的要求
- 推荐用
Symantec/GeoTrust/Godaddy/GlobalSign/comodo品牌的OV及以上证书,个人用户可签发DV证书。而CFCA品牌只在最新的苹果设备上才支持,不推荐CFCA品牌。不推荐使用免费证书;
- 推荐用
证书的哈希算法和秘钥长度的要求
- 证书的哈希算法:在上面推荐的证书品牌中是哈希算法都是SHA256或者更高强度的算法;

- 秘钥长度: 如果自己创建CSR,请使用2048位或以上的RSA加密算法;
传输协议的要求
必须满足 TLS1.2web服务器要求
Apache(2.2.23+) / Nginx(1.0.12+) 依赖 OpenSSL 1.0.1 + 以支持 TLSv1.2。

Tomcat 7 + Jdk 7.0 + 支持 TLSv1.2

IIS6(win2003)不支持,IIS7.5 默认未开启 TLSv1.2 需修改注册表以开启 TLSv1.2。
签字算法: 必须满足如下算法
TLS_ECDHE_ECDSA_WITH_AES_256_GCM_SHA384
TLS_ECDHE_ECDSA_WITH_AES_128_GCM_SHA256
TLS_ECDHE_ECDSA_WITH_AES_256_CBC_SHA384
TLS_ECDHE_ECDSA_WITH_AES_256_CBC_SHA
TLS_ECDHE_ECDSA_WITH_AES_128_CBC_SHA256
TLS_ECDHE_ECDSA_WITH_AES_128_CBC_SHA
TLS_ECDHE_RSA_WITH_AES_256_GCM_SHA384
TLS_ECDHE_RSA_WITH_AES_128_GCM_SHA256
TLS_ECDHE_RSA_WITH_AES_256_CBC_SHA384
TLS_ECDHE_RSA_WITH_AES_128_CBC_SHA256
TLS_ECDHE_RSA_WITH_AES_128_CBC_SHA
苹果
ATS特性服务器配置指南以下举例不同服务器的ATS协议及加密套件如何配置(只列举了与ATS有关的属性,请不要完全复制以下配置)Nginx 证书配置server {
ssl_ciphers ECDHE-RSA-AES128-GCM-SHA256:ECDHE:ECDH:AES:HIGH:!NULL:!aNULL:!MD5:!ADH:!RC4;
ssl_protocols TLSv1 TLSv1.1 TLSv1.2;
}Apache 证书配置<IfModule mod_ssl.c>
<VirtualHost *:443>
SSLProtocol TLSv1 TLSv1.1 TLSv1.2
SSLCipherSuite ECDHE-RSA-AES128-GCM-SHA256:ECDHE:ECDH:AES:HIGH:!NULL:!aNULL:!MD5:!ADH:!RC4
</VirtualHost>
</IfModule>Tomcat 证书配置<Connector port="443" protocol="HTTP/1.1" SSLEnabled="true"
scheme="https" secure="true"
ciphers="TLS_ECDHE_RSA_WITH_AES_128_GCM_SHA256"
SSLProtocol="TLSv1+TLSv1.1+TLSv1.2"
SSLCipherSuite="ECDHE-RSA-AES128-GCM-SHA256:ECDHE:ECDH:AES:HIGH:!NULL:!aNULL:!MD5:!ADH:!RC4"
/>
device_info_plus 插件获取设备信息
https://pub.dev/packages/device_info_plus
dependencies:
    device_info_plus: ^4.1.2
import 'dart:io';
import 'package:flutter/foundation.dart';
import 'package:flutter/material.dart';
import 'package:device_info_plus/device_info_plus.dart';

class DevicePage extends StatefulWidget {
    const DevicePage({super.key});
    @override
    State<DevicePage> createState() => _DevicePageState();
}

class _DevicePageState extends State<DevicePage> {
    late List<Widget> _list = [];

    @override
    void initState() {
        super.initState();
        _getDeviceInfo();
    }

    _getDeviceInfo() async {
        final deviceInfoPlugin = DeviceInfoPlugin();
        final deviceInfo = await deviceInfoPlugin.deviceInfo;
        final deviceInfoMap = deviceInfo.toMap();

        var templist = deviceInfoMap.entries.map((e) {
            return ListTile(
                title: Text("${e.key}:${e.value}"),
            );
        }).toList();

        setState(() {
            _list=templist;
        });
    }

    @override
    Widget build(BuildContext context) {
        return Scaffold(
            appBar: AppBar(
                title: const Text('Device演示'),
            ),
            body: ListView(
                children: _list,
            ),
        );
    }
}
配置完成插件后重新运行
connectivity_plus 检测网络
地址: https://pub.dev/packages/connectivity_plus
dependencies:
    connectivity_plus: ^2.3.6+1
import 'package:connectivity_plus/connectivity_plus.dart';
import 'package:flutter/material.dart';
import 'package:connectivity_plus/connectivity_plus.dart';

class NetworkPage extends StatefulWidget {
    const NetworkPage({super.key});
    @override
    State<NetworkPage> createState() => _NetworkPageState();
}

class _NetworkPageState extends State<NetworkPage> {
    dynamic subscription;
    String _stateText = "检测中...";

    @override
    void initState() {
        super.initState();
        subscription = Connectivity()
            .onConnectivityChanged
            .listen((ConnectivityResult result) {
                if (result == ConnectivityResult.wifi) {
                    setState(() {
                        _stateText = "处于 wifi";
                    });
                } else if (result == ConnectivityResult.mobile) {
                    setState(() {
                        _stateText = "处于手机网络";
                    });
                } else {
                    setState(() {
                        _stateText = "没有网络";
                    });
                }
            });
    }

    @override
    void dispose() {
        // TODO: implement dispose
        super.dispose();
        subscription.cancel();
    }

    @override
    Widget build(BuildContext context) {
        return Scaffold(
            appBar: AppBar(
                title: const Text('检测网络'),
            ),
            body: Center(
                child: Text(_stateText),
            ),
        );
    }
}
url_launcher 配置打开 URL 、拨打电话 、发送短信 、打开外部应用 、打开高德地图
地址:https://pub.dev/packages/url_launcher
Android 配置
修改:android\app\src\main\AndroidManifest.xml
<!-- Provide required visibility configuration for API level 30 and above -->
<queries>
    <!-- If your app checks for SMS support -->
    <intent>
        <action android:name="android.intent.action.VIEW" />
        <data android:scheme="sms" />
    </intent>
    <!-- If your app checks for call support -->
    <intent>
        <action android:name="android.intent.action.VIEW" />
        <data android:scheme="tel" />
    </intent>
</queries>
<uses-permission android:name="android.permission.QUERY_ALL_PACKAGES"/>
Ios 配置
配置拨打电话、发送邮件、打开外部应用、高德地图导航 Info.plist
<key>LSApplicationQueriesSchemes</key>
<array>
    <string>iosamap</string>
    <string>baidumap</string>
    <string>sms</string>
    <string>tel</string>
    <string>weixin</string>
    <string>alipays</string>
</array>
高德官网导航地址:https://lbs.amap.com/api/amap-mobile/guide/android/navigation
坐标吸取器:https://lbs.amap.com/tools/picker
import 'dart:io';
import 'package:flutter/material.dart';
import 'package:url_launcher/url_launcher.dart';

class UrlLauncherPage extends StatefulWidget {
    const UrlLauncherPage({super.key});
    @override
    State<UrlLauncherPage> createState() => _UrlLauncherPageState();
}

class _UrlLauncherPageState extends State<UrlLauncherPage> {
    @override
    Widget build(BuildContext context) {
        return Scaffold(
            appBar: AppBar(
                title: const Text('UrlLauncherPage'),
            ),
            body: Center(
                child: Padding(
                    padding: const EdgeInsets.all(20),
                    child: ListView(
                        children: [
                            ElevatedButton(
                                child: const Text('打开外部浏览器'),
                                onPressed: () async {
                                    final Uri url = Uri.parse('https://www.baidu.com');
                                    if (await canLaunchUrl(url)) {
                                        await launchUrl(url);
                                    } else {
                                        throw 'Could not launch $url';
                                    }
                                },
                            ),
                            const SizedBox(height: 10),
                            ElevatedButton(
                                child: const Text('拨打电话'),
                                onPressed: () async {
                                    final Uri tel = Uri.parse('tel:10086');
                                    if (await canLaunchUrl(tel)) {
                                        await launchUrl(tel);
                                    } else {
                                        throw 'Could not launch $tel';
                                    }
                                },
                            ),
                            const SizedBox(height: 10),
                            ElevatedButton(
                                child: const Text('发送短信'),
                                onPressed: () async {
                                final Uri tel = Uri.parse('sms:10086');
                                // var tel = 'sms:10086';
                                    if (await canLaunchUrl(tel)) {
                                        await launchUrl(tel);
                                    } else {
                                        throw 'Could not launch $tel';
                                    }
                                },
                            ),
                            const SizedBox(height: 10),
                            ElevatedButton(
                                child: const Text('打开外部应用-支付宝'),
                                onPressed: () async {
                                    /*
                                    weixin://
                                    alipays://
                                    */
                                    final Uri alipays = Uri.parse('alipays://');
                                    if (await canLaunchUrl(alipays)) {
                                        await launchUrl(alipays);
                                    } else {
                                        throw 'Could not launch $alipays';
                                    }
                                },
                            ),
                            const SizedBox(height: 10),
                            ElevatedButton(
                                child: const Text('打开外部应用-微信'),
                                onPressed: () async {
                                    /*
                                    weixin://
                                    alipays://
                                    */
                                    final Uri weixin = Uri.parse('weixin://');
                                    if (await canLaunchUrl(weixin)) {
                                        await launchUrl(weixin);
                                    } else {
                                        throw 'Could not launch $weixin';
                                    }
                                },
                            ),
                            const SizedBox(height: 10),
                            ElevatedButton(
                                child: const Text('打开外部应用-高德地图'),
                                onPressed: () async {
                                    String title = "北京大学";
                                    String latitude = "39.992806";
                                    String longitude = "116.310905";

                                    Uri uri = Uri.parse(
                                    '${Platform.isAndroid ? 'android' : 'ios'}amap://navi?
                                    sourceApplication=amap&lat=$latitude&lon=$longitude&dev=0&style=2&poiname=${titl
                                    e}');

                                    // if (Platform.isIOS) url = Uri.encodeFull(url);
                                    // if (Platform.isIOS) url = Uri.encodeFull(url);
                                    // url=Uri.parse(url);

                                    try {
                                        if (await canLaunchUrl(uri)) {
                                            await launchUrl(uri);
                                        } else {
                                            print('无法调起高德地图');
                                        }
                                    } catch (e) {
                                        print('无法调起高德地图');
                                    }
                                }
                            ),
                        ]
                    ),
                )
            )
        );
    }
}
App Store 中 常见 App 的 scheme
电商
taobao : 淘宝
tmall : 天猫
jdlogin : 京东
pinduoduo : 拼多多
kaola : 网易考拉
yanxuan : 网易严选
vipshop : 唯品会
suning : 苏宁
mishopv1 : 小米商城
wireless1688 : 阿里巴巴

社交、社区-->
weibo : 微博
zhihu : 知乎
xhsdiscover : 小红书
momochat : 陌陌
blued : blued
mqzone : QQ空间
mqq : QQ
tantanapp : 探探
huputiyu : 虎扑
com.baidu.tieba : 贴吧
tianya : 天涯社区
douban : 豆瓣
jike : 即刻

短视频
snssdk1128 : 抖音
snssdk1112 : 火山
snssdk32 : 西瓜视频
gifshow : 快手

视频/直播
tenvideo : 腾讯视频
youku : 优酷
bilibili : B站
imgotv : 芒果TV
qiyi-iphone : 爱奇艺
hanju : 韩剧TV
douyutv : 斗鱼
yykiwi : 虎牙

图片处理
mtxx.open : 美图秀秀
faceu : faceu国内
ulike : 轻颜国内

资讯
snssdk141 : 今日头条
newsapp : 网易新闻
qqnews : 腾讯新闻
iting : 喜马拉雅
weread : 微信读书
jianshu : 简书
igetApp : 得到
kuaikan : 快看漫画

财经
sinanews : 新浪财经
amihexin : 同花顺炒股

音乐
orpheus : 网易云音乐
qqmusic : qq音乐
kugouURL : 酷狗
qmkege : 全民K歌
changba : 唱吧

工具
iosamap : 高德地图
baidumap : 百度地图
baiduyun : 百度网盘
rm434209233MojiWeather : 墨迹天气办公
wxwork : 企业微信
dingtalk : 钉钉

生活
imeituan : 美团
dianping : 点评
cainiao : 菜鸟裹裹
wbmain : 58同城
mihome : 米家

美食佳饮
xcfapp : 下厨房
sbuxcn : 星巴克中国
meituanwaimai : 美团外卖

运动健康
fb370547106731052 : 小米运动
meetyou.linggan : 美柚
babytree : 宝宝树
keep : keep

旅行
CtripWireless : 携程
diditaxi : 滴滴
taobaotravel : 飞猪
travelguide : 马蜂窝

游戏
tencent1104466820 : 王者荣耀
tencent100689805 : 天天爱消除
tencent382 : QQ斗地主
ImagePicker拍照、录制视频、相册选择照片、相册选择视频、上传文件
地址:https://pub.dev/packages/image_picker
android无需配置开箱即用,ios还需要配置info.plist
<key>NSPhotoLibraryUsageDescription</key>
<string>应用需要访问相册读取文件</string>
<key>NSCameraUsageDescription</key>
<string>应用需要访问相机拍照</string>
<key>NSMicrophoneUsageDescription</key>
<string>应用需要访问麦克风录制视频</string>
注意:使用相机拍摄的图像和视频会保存到应用程序的本地缓存中,因此应该只是暂时存在。如果您需 要永久存储您挑选的图像,您有责任将其移动到更永久的位置
image_picker实现相机拍照和相册选择
final ImagePicker _picker = ImagePicker();
XFile? _imageFileDir;
拍照
_takePhoto() async {
    XFile? pickedFile = await _picker.pickImage(
        source: ImageSource.camera,
        maxWidth: 600,
        maxHeight: 600
    );
    if (pickedFile != null) {
        setState(() {
            _imageFileDir = pickedFile;
        });
    }
}
相册选择
_openGallery() async {
    XFile? pickedFile = await _picker.pickImage(
        source: ImageSource.gallery,
        maxWidth: 600,
        maxHeight: 600
    );
    if (pickedFile != null) {
        setState(() {
            _imageFileDir = pickedFile;
        });
    }
}
image_picker 录制视频、相册选择视频
final ImagePicker _picker = ImagePicker();
XFile? _videoFileDir;
录制视频
_pickVideo() async {
    XFile? pickedFile = await _picker.pickVideo(
        source: ImageSource.camera
    );
    if (pickedFile != null) {
        await _initVideo(File(pickedFile.path));
        setState(() {
            _videoFileDir = pickedFile;
        });
    }
}
相册选择视频
_openGalleryVideo() async {
    XFile? pickedFile = await _picker.pickVideo(
        source: ImageSource.gallery
    );
    if (pickedFile != null) {
        await _initVideo(File(pickedFile.path));
        setState(() {
            _videoFileDir = pickedFile;
        });
    }
}
实现图片视频上传
_openGallery() async {
    XFile? pickedFile = await _picker.pickImage(
        source: ImageSource.gallery,
        maxWidth: 600,
        maxHeight: 600
    );
    if (pickedFile != null) {
        setState(() {
            _imageFileDir = pickedFile;
        });
        _uploadFile(pickedFile.path);
    }
}
_uploadFile(String imagePath) async {
    var formData = FormData.fromMap({
        'name': 'wendux',
        'age': 25,
        'file': await MultipartFile.fromFile(imagePath,
            filename: 'aaa.png'
        ),
    });
    //https://jd.itying.com/imgupload
    //https://jd.itying.com/public/upload/UCO0ZgNYzxkFsjFcGjoVPxkp.png
    var response = await Dio().post('https://jdmall.itying.com/imgupload',
        data: formData
    );
    print(response);
}
import 'dart:io';
import 'dart:math';
import 'package:flutter/material.dart';
import 'package:image_picker/image_picker.dart';
import 'package:dio/dio.dart';
import 'package:video_player/video_player.dart';
import 'package:chewie/chewie.dart';

class ImagePickerPage extends StatefulWidget {
    const ImagePickerPage({super.key});
    @override
    State<ImagePickerPage> createState() => _ImagePickerPageState();
}

class _ImagePickerPageState extends State<ImagePickerPage> {
    final ImagePicker _picker = ImagePicker();
    XFile? _imageFileDir;
    XFile? _videoFileDir;
    //配置播放视频

    late VideoPlayerController videoPlayerController;
    late ChewieController chewieController;

    _initVideo(filePath) async {
        videoPlayerController = VideoPlayerController.file(filePath);
        await videoPlayerController.initialize();

        chewieController = ChewieController(
            videoPlayerController: videoPlayerController,
            aspectRatio: videoPlayerController.value.aspectRatio,
            autoPlay: true,
            looping: true,
            optionsBuilder: (context, defaultOptions) async {
                //defaultOptions保存了对应的按钮 先打印然后再去自定义
                return await showModalBottomSheet(
                    context: context,
                    builder: (context) {
                        return SizedBox(
                            height: 120,
                            child: ListView(
                                children: [
                                    ListTile(
                                        title: const Text("播放速度"),
                                        onTap: () {
                                            defaultOptions[0].onTap!();
                                        },
                                    ),
                                    ListTile(
                                        title: const Text("取消"),
                                        onTap: () {
                                            Navigator.of(context).pop();
                                        },
                                    )
                                ],
                            ),
                        );
                    }
                );
            },
        );
    }

    @override
    void dispose() {
        videoPlayerController.dispose();
        chewieController.dispose();
        super.dispose();
    }

    @override
    Widget build(BuildContext context) {
        return Scaffold(
            appBar: AppBar(
                title: const Text('Title'),
            ),
            body: Center(
                child: ListView(
                    padding: const EdgeInsets.all(20),
                    children: <Widget>[
                        ElevatedButton(
                            onPressed: _takePhoto,
                            child: const Text("拍照"),
                        ),
                        ElevatedButton(
                            onPressed: _openGallery,
                            child: const Text("选择图库照片"),
                        ),
                        ElevatedButton(
                            onPressed: _pickVideo,
                            child: const Text("录制视频"),
                        ),
                        ElevatedButton(
                            onPressed: _openGalleryVideo,
                            child: const Text("选择视频"),
                        ),
                        _imageFileDir == null
                            ? const Text("")
                            : Image.file(File(_imageFileDir!.path)
                        ),
                        _videoFileDir == null
                            ? const Text("")
                            : AspectRatio(
                                aspectRatio: videoPlayerController.value.aspectRatio,
                                child: Chewie(
                                    controller: chewieController
                                ),
                        ),
                    ],
                ),
            ),
        );
    }

    /*拍照*/
    _takePhoto() async {
        XFile? pickedFile = await _picker.pickImage(
            source: ImageSource.camera,
            maxWidth: 600,
            maxHeight: 600
        );

        if (pickedFile != null) {
            setState(() {
                _imageFileDir = pickedFile;
            });
        }
    }

    /*相册*/
    _openGallery() async {
        XFile? pickedFile = await _picker.pickImage(
            source: ImageSource.gallery,
            maxWidth: 600,
            maxHeight: 600
        );

        if (pickedFile != null) {
            setState(() {
                _imageFileDir = pickedFile;
            });
            _uploadFile(pickedFile.path);
        }
    }

    //录制视频
    _pickVideo() async {
        XFile? pickedFile = await _picker.pickVideo(
            source: ImageSource.camera
        );

        if (pickedFile != null) {
            await _initVideo(File(pickedFile.path));
            setState(() {
                _videoFileDir = pickedFile;
            });
        }
    }

    //选择视频
    _openGalleryVideo() async {
        XFile? pickedFile = await _picker.pickVideo(
            source: ImageSource.gallery
        );
        if (pickedFile != null) {
            await _initVideo(File(pickedFile.path));
            setState(() {
                _videoFileDir = pickedFile;
            });
        }
    }

    /*上传文件*/
    _uploadFile(String imagePath) async {
        var formData = FormData.fromMap({
            'name': 'wendux',
            'age': 25,
            'file': await MultipartFile.fromFile(imagePath, filename: 'aaa.png'),
        });

        //https://jd.itying.com/imgupload
        //https://jd.itying.com/public/upload/UCO0ZgNYzxkFsjFcGjoVPxkp.png

        var response = await Dio().post('https://jdmall.itying.com/imgupload',
            data: formData
        );
        print(response);
    }
}
本地存储 shared_preferences
shared_preferences 是一个简单的,异步的,持久化的 key-value 存储系统。
地址:https://pub.dev/packages/shared_preferences
// Obtain shared preferences.
final prefs = await SharedPreferences.getInstance();
// Save an integer value to 'counter' key.
await prefs.setInt('counter', 10);
// Save an boolean value to 'repeat' key.
await prefs.setBool('repeat', true);
// Save an double value to 'decimal' key.
await prefs.setDouble('decimal', 1.5);
// Save an String value to 'action' key.
await prefs.setString('action', 'Start');
// Save an list of strings to 'items' key.
await prefs.setStringList('items', <String>['Earth', 'Moon', 'Sun']);
// Try reading data from the 'counter' key. If it doesn't exist, returns null.
final int? counter = prefs.getInt('counter');
// Try reading data from the 'repeat' key. If it doesn't exist, returns null.
final bool? repeat = prefs.getBool('repeat');
// Try reading data from the 'decimal' key. If it doesn't exist, returns null.
final double? decimal = prefs.getDouble('decimal');
// Try reading data from the 'action' key. If it doesn't exist, returns null.
final String? action = prefs.getString('action');
// Try reading data from the 'items' key. If it doesn't exist, returns null.
final List<String>? items = prefs.getStringList('items');
// Remove data for the 'counter' key.
final success = await prefs.remove('counter');
import 'dart:convert';
import 'package:shared_preferences/shared_preferences.dart';

class Storage{
    static setData(String key,dynamic value) async{
        SharedPreferences pref=await SharedPreferences.getInstance();
        pref.setString(key, json.encode(value));
    }
    static getData(String key) async{
        SharedPreferences pref=await SharedPreferences.getInstance();
        String? data=pref.getString(key);
        return json.decode(data!);
    }
    static removeData(String key) async{
        SharedPreferences pref=await SharedPreferences.getInstance();
        return pref.remove(key);
    }
}
调用原生硬件 Api 实现扫码
barcode_scan2 可以实现扫描条形码、二维码
地址:https://pub.dev/packages/barcode_scan2
Android里面的配置
dependencies:
    barcode_scan2: ^4.1.3
Add the camera permission to your AndroidManifest.xml
配置:android\app\src\main\AndroidManifest.xml
<uses-permission android:name="android.permission.CAMERA" />
编辑你的 android 目录下面的 build.gradle (Edit your project-level build.gradle file to look like this)
注意:如果 ext.kotlin_version 的版本大于 1.3.61 则无需配置
buildscript {
    ext.kotlin_version = '1.3.61'
    // ...
    dependencies {
        // ...
        classpath "org.jetbrains.kotlin:kotlin-gradle-plugin:$kotlin_version"
    }
}
编辑你的 android/app 目录下面的 build.gradle (Edit your app-level build.gradle file to look like this)
apply plugin: 'kotlin-android'
// ...
dependencies {
    implementation "org.jetbrains.kotlin:kotlin-stdlib-jdk7:$kotlin_version"
    // ...
}
注意:minSdkVersion 18 以上
defaultConfig {
    ...
    minSdkVersion 18
    ...
}
提示:如果您使用的是最新版本的 flutter sdk ,在 Android 里面只需要配置 minSdkVersion 18 和 CAMERA 的权限 。
Ios里面的配置
<dict>
    <!-- ... -->
    <key>NSCameraUsageDescription</key>
    <string>Camera permission is required for barcode scanning.</string>
    <!-- ... -->
</dict>
import 'package:flutter/material.dart';
import 'package:barcode_scan2/barcode_scan2.dart';

class BarcodeScanPage extends StatefulWidget {
    const BarcodeScanPage({super.key});
    @override
    State<BarcodeScanPage> createState() => _BarcodeScanPageState();
}

class _BarcodeScanPageState extends State<BarcodeScanPage> {
    void _doBarcodeScan() async {
        var options = const ScanOptions(
            // set the options
            autoEnableFlash: true,
            strings: {
            'cancel': '取消',
            'flash_on': '打开Flash',
            'flash_off': '关闭Flash',
        });

        var result = await BarcodeScanner.scan(options: options);

        print(result.type); // The result type (barcode, cancelled, failed)
        print(result.rawContent); // The barcode content
        print(result.format); // The barcode format (as enum)
        print(result.formatNote); // If a unknown format was scanned this field contains a note
    }

    @override
    Widget build(BuildContext context) {
        return Scaffold(
            appBar: AppBar(
                title: const Text("扫码演示")
            ),
            body: Center(
                child: Column(
                    mainAxisAlignment: MainAxisAlignment.center,
                    children: <Widget>[
                        ElevatedButton(
                            onPressed: _doBarcodeScan,
                            child: const Text("扫描二维码 条形码"),
                        )
                    ],
                ),
            ),
        );
    }
}
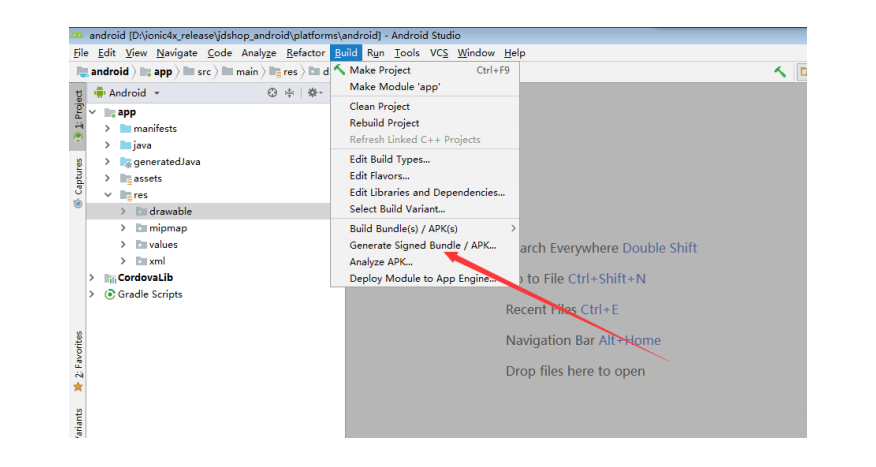
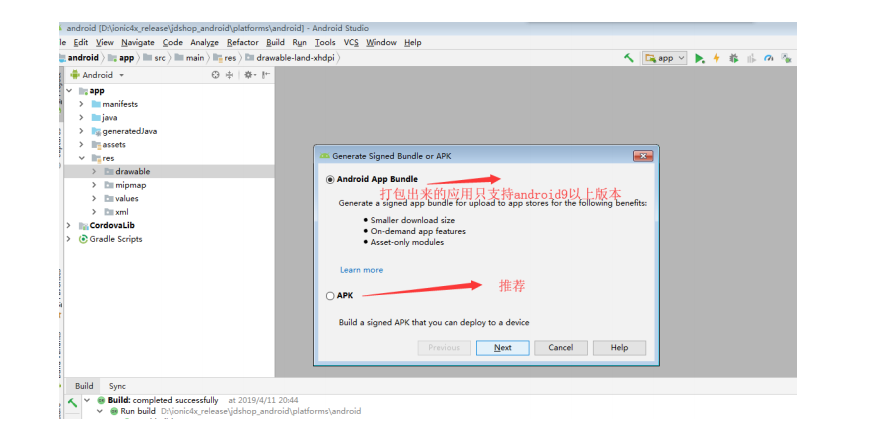
打包
android 打包
把 Flutter 打包成正式包
修改应用版本以及升级打包
找到 AndroidManifest.xml 修改应用的版本号
配置:android\app\src\main\AndroidManifest.xml
<manifest android:hardwareAccelerated="true"
android:versionCode="1" android:versionName="0.0.1"
package="io.jdshop.demo"
xmlns:android="http://schemas.android.com/apk/res/android">
找到 pubspec.yaml 修改应用的版本号
version: 1.0.0+1
升级打包的步骤和 Android 正式打包的步骤一样的,注意升级打包的时候使用签名文件要和第一次正式打包的签名一样。
不同终端屏幕适配方案
常见手机的分别率
常见的苹果手机分别率:
| 机型 | 分辨率 |
|---|---|
| 6 | 1334x750 像素 |
| 6 plus | 1920x1080 像素 |
| 6s | 1334x750 像素 |
| 6 splus | 1334x750 像素 |
| 7 | 1334x750 像素 |
| 7 plus | 1920x1080 像素 |
| se | 1136x640 像素 |
| 8 | 1334x750 像素 |
| 8 plus | 1920x1080 像素 |
| x | 2436x1125 像素 |
| xs Max | 2688x1242 像素 |
| xr | 1792x828 像素 |
| 11 | 1792x828 像素 |
| 11 Pro | 2436x1125 像素 |
| 11 ProMax | 2688x1242 像素 |
| se2 | 1334x750 像素 |
| 12 mini | 2340x1080 像素 |
| 12 | 2532x1170 像素 |
| 12 Pro | 2532x1170 像素 |
| 12 ProMax | 2778x1284 像素 |
| 13 | 2532x1170 像素 |
| 14 | 2532x1170 像素 |
主流 android 手机分别率:
1920*1080
2400*1080
2560*1440
屏幕适配方案
flutter_screenutil 是 flutter 屏幕适配方案,用于调整屏幕和字体大小的 flutter 插件,让你的
UI 在不同尺寸的屏幕上都能显示合理的布局!
此插件全部核心代码:
import 'package:flutter/material.dart';

class ScreenUtil {
    static ScreenUtil instance = new ScreenUtil();

    //设计稿的设备尺寸修改
    double width;
    double height;
    bool allowFontScaling;

    static MediaQueryData _mediaQueryData;
    static double _screenWidth;
    static double _screenHeight;
    static double _pixelRatio;
    static double _statusBarHeight;
    static double _bottomBarHeight;
    static double _textScaleFactor;

    ScreenUtil({
        this.width = 1080, this.height = 1920, this.allowFontScaling = false, });
        static ScreenUtil getInstance() {
        return instance;
    }

    void init(BuildContext context) {
        MediaQueryData mediaQuery = MediaQuery.of(context); _mediaQueryData = mediaQuery; _pixelRatio = mediaQuery.devicePixelRatio; _screenWidth = mediaQuery.size.width; _screenHeight = mediaQuery.size.height; _statusBarHeight = mediaQuery.padding.top; _bottomBarHeight = _mediaQueryData.padding.bottom; _textScaleFactor = mediaQuery.textScaleFactor;
    }

    static MediaQueryData get mediaQueryData => _mediaQueryData;///每个逻辑像素的字体像素数,字体的缩放比例

    static double get textScaleFactory => _textScaleFactor;
    ///设备的像素密度
    static double get pixelRatio => _pixelRatio;
    ///当前设备宽度 dp
    static double get screenWidthDp => _screenWidth;
    ///当前设备高度 dp
    static double get screenHeightDp => _screenHeight;
    ///当前设备宽度 px
    static double get screenWidth => _screenWidth * _pixelRatio;
    ///当前设备高度 px
    static double get screenHeight => _screenHeight * _pixelRatio;
    ///状态栏高度 dp 刘海屏会更高
    static double get statusBarHeight => _statusBarHeight;
    ///底部安全区距离 dp
    static double get bottomBarHeight => _bottomBarHeight;
    ///实际的 dp 与设计稿 px 的比例
    get scaleWidth => _screenWidth / instance.width;
    get scaleHeight => _screenHeight / instance.height;

    ///根据设计稿的设备宽度适配
    ///高度也根据这个来做适配可以保证不变形

    setWidth(double width) => width * scaleWidth;

    /// 根据设计稿的设备高度适配
    /// 当发现设计稿中的一屏显示的与当前样式效果不符合时, /// 或者形状有差异时,高度适配建议使用此方法
    /// 高度适配主要针对想根据设计稿的一屏展示一样的效果

    setHeight(double height) => height * scaleHeight;

    ///字体大小适配方法
    ///@param fontSize 传入设计稿上字体的 px , ///@param allowFontScaling 控制字体是否要根据系统的“字体大小”辅助选项来进行缩
    放。默认值为 false。///@param allowFontScaling Specifies whether fonts should scale to respect Text Size
    accessibility settings. The default is false. setSp(double fontSize) => allowFontScaling
    ? setWidth(fontSize)
    : setWidth(fontSize) / _textScaleFactor;
}
自定义适配类
import 'package:flutter_screenutil/flutter_screenutil.dart';
class ScreenAdapter {
    static height(num value) {
        return value.h;
    }
    static width(num value) {
        return value.w;
    }
    static size(num value) {
        return ScreenUtil().setSp(value);
    }
    static getScreenWidth() {
        return ScreenUtil().screenWidth; //获取设备的物理宽度
    }
    static getScreenHeight() {
        return ScreenUtil().screenHeight; //获取设备的物理高度
    }
}
import 'package:flutter/material.dart';
import 'package:flutter/services.dart';
import 'package:get/get.dart';
import 'app/routes/app_pages.dart';
import 'package:flutter_screenutil/flutter_screenutil.dart';

void main() {
    SystemUiOverlayStyle systemUiOverlayStyle = const SystemUiOverlayStyle(
        statusBarColor: Colors.red, // 顶部状态栏背景颜色
        systemNavigationBarColor: Colors.yellow, // 底部安全区背景颜色
    );

    SystemChrome.setSystemUIOverlayStyle(systemUiOverlayStyle);

    runApp(
        ScreenUtilInit(
            designSize: const Size(1080, 2400),   // 设计稿的宽度和高度 px
            minTextAdapt: true, // 适配最小文字
            splitScreenMode: true, // 支持分屏尺寸
            builder: (BuildContext context , child) {
                return  GetMaterialApp(
                    debugShowCheckedModeBanner: false,
                    title: "Application",
                    initialRoute: AppPages.INITIAL,
                    getPages: AppPages.routes,
                );
            }
        )
    );
}
序列化
- 使用
dart:convert手动序列化JSON - 模型类中序列化
JSON
小项目中使用 dart:convert 手动序列化 JSON 非常好,也非常快速。但是随着项目的增大,
dart:convert 手动序列化 JSON 的话失去了大部分静态类型语言特性:类型安全、自动补全和
最重要的编译时异常。这样一来,我们的代码可能会变得非常容易出错。
当我们访问 name 或 email 字段时,我们输入的很快,导致字段名打错了。但由于这个 JSON
在 map 结构中,所以编译器不知道这个错误的字段名。
为了解决上面的问题在大型项目中使用的更多的是在模型类中序列化 JSON 。
JSON 字符串和 Map 类型的转换 dart:convert 手动序列化 JSON
import 'dart:convert'
var mapData = { "name": "张三", "age": "20" };
var strData = '{"name":"张三","age":"20"}';
print(json.encode(mapData)); //Map 转换成 Json 字符串
print(json.decode(strData)); //Json 字符串转化成 Map 类型
class FocusModel {
    String? sId;
    String? title;
    String? status;
    String? pic;
    String? url;

    FocusModel({this.sId, this.title, this.status, this.pic, this.url});

    FocusModel.fromJson(Map<String, dynamic> json) {
        sId = json['_id'];
        title = json['title'];
        status = json['status'];
        pic = json['pic'];
        url = json['url'];
    }

    Map<String, dynamic> toJson() {
        final Map<String, dynamic> data = <String, dynamic>{};
        data['_id'] = sId;
        data['title'] = title;
        data['status'] = status;
        data['pic'] = pic;
        data['url'] = url;return data;
    }
}

var strData='{"_id":"59f6ef443ce1fb0fb02c7a43","title":"笔记本电脑","status":"1","pic":"public\\upload\\UObZahqPYzFvx_C9CQjU8KiX.png","url":"12"}';

var data=FocusModel.fromJson(strData)
json 字符串生成模型类的几种方法
- 在线生成 https://autocode.icu/jsontodart (推荐)
- get_cli 生成 get generate model on models from https://xiaomi.itying.com/api/focus
- 使用第三方库生成 https://doc.flutterchina.club/json/
点击事件怎么办?
AppBar(
    leading: controller.flag.value
        ? const Text('')
        : const Icon(
            Icons.abc,
            color: Colors.green,
            ),
    leadingWidth: controller.flag.value
        ? ScreenAdapter.width(40)
        : ScreenAdapter.width(140),
    elevation: 0,
    backgroundColor:
        !controller.flag.value ? Colors.transparent : Colors.green,
    title: GestureDetector( // 使用这个容器来包裹就可以有 onTap 事件
        onTap: () {
            print('1');
        },
        child: AnimatedContainer(
            width: ScreenAdapter.width(800),
            height: ScreenAdapter.height(96),
            decoration: BoxDecoration(
                color: Colors.green,
                borderRadius: BorderRadius.circular(30),
            ),
            duration: const Duration(
                milliseconds: 600,
            ),
            onEnd: () {
                print('1');
            },
        ),
    ),
    actions: [
        IconButton(
            onPressed: () {},
            icon: const Icon(
                Icons.qr_code,
                color: Colors.green,
            )
        ),
        IconButton(
            onPressed: () {},
            icon: const Icon(
                Icons.message,
                color: Colors.green,
            )
        )
    ],
),